
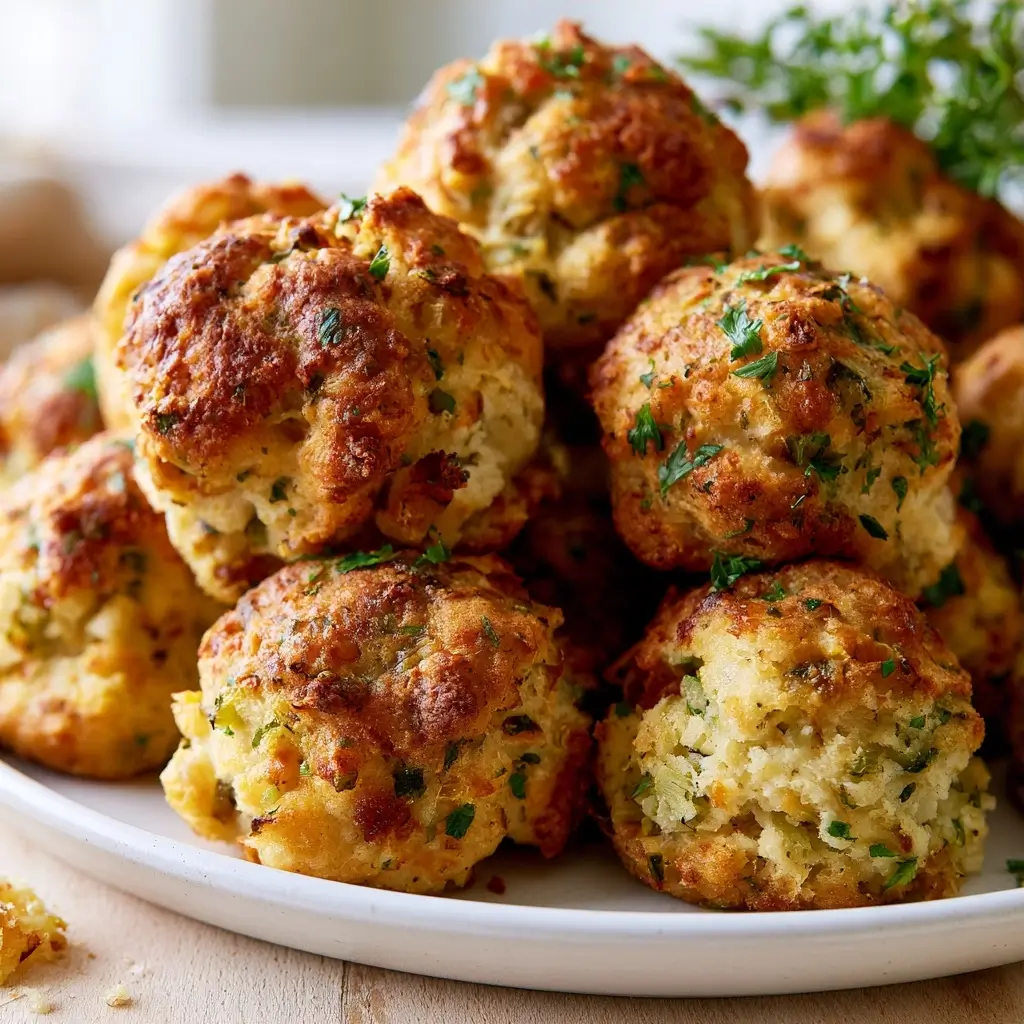
These Thanksgiving stuffing balls bake up crisp around the edges and tender in the middle, with buttery bread, celery, onion, and plenty of herbs in every bite. I love serving them when I want all the cozy flavor of classic stuffing in a tidy, easy-to-pass shape.
Why You’ll Love These Stuffing Balls
Each ball gets a lovely golden exterior while staying soft and savory inside. They’re easy to portion, simple to make ahead, and a welcome addition to a Thanksgiving table. The familiar mix of sage, thyme, and parsley makes them taste like a comforting holiday classic.
Stuffing Balls Ingredients & Substitutions
- 10 cups dried bread cubes, about 1 pound, preferably a day-old country loaf
- 1/2 cup unsalted butter
- 1 medium yellow onion, finely diced
- 3 celery ribs, finely diced
- 2 tablespoons chopped fresh parsley
- 1 teaspoon dried sage
- 1/2 teaspoon dried thyme
- 1/2 teaspoon kosher salt, plus more to taste
- 1/4 teaspoon black pepper
- 2 large eggs, beaten
- 1 1/2 to 2 cups chicken broth, warmed
Use sturdy white or country bread so the cubes hold their shape. Fresh herbs work well too: use about 1 tablespoon chopped sage and 1 teaspoon chopped thyme in place of the dried herbs. Vegetable broth can replace chicken broth, and the amount you need may vary depending on how dry your bread is.
Step-by-Step Instructions to Make Stuffing Balls
1. Dry the bread
If your bread isn’t already stale, spread the cubes on a baking sheet and bake at 250°F (120°C) for about 30 minutes, stirring once, until dry but not browned. Transfer them to a large mixing bowl.
2. Soften the vegetables
Melt the butter in a skillet over medium heat. Add the onion and celery, then cook for 7 to 9 minutes, stirring now and then, until softened. Stir in the parsley, sage, thyme, salt, and pepper.
3. Mix the stuffing
Spoon the buttery vegetable mixture over the bread cubes and toss to coat. Stir in the beaten eggs. Add 1 1/2 cups of warm broth gradually, tossing as you go, until the bread is moist and holds together when pressed. Add more broth a little at a time if needed, but avoid making the mixture soggy.
4. Shape the balls
Heat the oven to 375°F (190°C) and line a baking sheet with parchment paper. With lightly damp hands, shape the mixture into 12 firm balls, about 2 1/2 inches wide, and arrange them on the sheet with a little room between each one.
5. Bake until golden
Bake for 25 to 30 minutes, until the stuffing balls are set and golden on the outside. Let them rest for 5 minutes before serving so they hold together nicely.
Tips for Success
- Dry bread absorbs the broth more evenly and helps the finished balls keep their shape.
- Add broth slowly. The mixture should feel moist and pack together, not wet or mushy.
- Press each ball firmly while shaping to help it stay intact in the oven.
- For even baking, make the balls a similar size and leave space between them on the baking sheet.
- Taste a small pinch of the mixture before shaping and adjust the seasoning if needed.
Variations of Stuffing Balls
For a more aromatic version, add 1/2 teaspoon of finely grated lemon zest. Fold in 1/2 cup of dried cranberries for a sweet-tart note, or add 1/2 cup of chopped toasted pecans for crunch. You can also stir in 1/2 cup of sautéed mushrooms, letting them cook until their moisture evaporates before mixing them in.
Serving Suggestions: What to Pair with Stuffing Balls
Serve these alongside roast turkey, mashed potatoes, green beans, or roasted carrots. They’re especially good with a spoonful of warm gravy, and they fit right in on a Thanksgiving buffet. For a smaller meal, pair a couple with a green salad and roasted vegetables.
Storage & Reheating Instructions
Cool leftover stuffing balls, then store them in an airtight container in the refrigerator for up to 3 days. Reheat on a baking sheet at 350°F (175°C) for about 10 to 15 minutes, until hot in the center. You can also microwave them, though the exterior will be softer. To make them ahead, shape the balls and refrigerate them covered for up to 1 day before baking.
Memories Made Around the Table
I love how a dish with a name like Grandma Dot’s invites everyone to linger over the story behind it. These little bundles of crisp edges and herby, buttery centers are made for passing around the table, sharing second helpings, and making room for one more favorite side.
FAQs
Can I make stuffing balls ahead of time?
Yes. Shape them, cover, and refrigerate for up to 1 day before baking. If they feel quite cold going into the oven, add a few extra minutes to the baking time.
Why are my stuffing balls falling apart?
The mixture may be too dry, or the balls may not be packed firmly enough. Add broth a tablespoon at a time until the bread holds together when squeezed, then press each ball firmly as you shape it.
Can I freeze stuffing balls?
Yes. Freeze the baked and cooled balls in a single layer, then move them to a freezer-safe container for up to 2 months. Reheat from frozen in a 350°F (175°C) oven until warmed through.
Can I use fresh bread?
Yes, but dry it first so it can absorb the seasonings and broth without turning mushy. Cut the bread into cubes and bake at 250°F (120°C) until dry.
Final Thoughts
These Thanksgiving stuffing balls bring the cozy, savory flavor of classic stuffing to the table in a fun, easy-to-serve form. Make a batch for your holiday meal, and don’t be surprised if everyone reaches for seconds.

Grandma Dot's Stuffing Balls
Equipment
- 1 Baking Sheet
- 1 Skillet
- 1 Large mixing bowl
Ingredients
- 10 cups dried bread cubes about 1 pound, preferably from a day-old country loaf
- 0.5 cup unsalted butter
- 1 medium yellow onion finely diced
- 3 ribs celery finely diced
- 2 tablespoons fresh parsley chopped
- 1 teaspoon dried sage
- 0.5 teaspoon dried thyme
- 0.5 teaspoon kosher salt plus more to taste
- 0.25 teaspoon black pepper
- 2 large eggs beaten
- 1 ½ to 2 cups chicken broth warmed; add gradually as needed
Instructions
- If your bread isn’t already stale, spread the cubes on a baking sheet and bake at 250°F (120°C) for about 30 minutes, stirring once, until dry but not browned. Transfer them to a large mixing bowl.
- Melt the butter in a skillet over medium heat. Add the onion and celery, then cook for 7 to 9 minutes, stirring now and then, until softened. Stir in the parsley, sage, thyme, salt, and pepper.
- Spoon the buttery vegetable mixture over the bread cubes and toss to coat. Stir in the beaten eggs. Add 1 1/2 cups of warm broth gradually, tossing as you go, until the bread is moist and holds together when pressed. Add more broth a little at a time if needed, but avoid making the mixture soggy.
- Heat the oven to 375°F (190°C) and line a baking sheet with parchment paper. With lightly damp hands, shape the mixture into 12 firm balls, about 2 1/2 inches wide, and arrange them on the sheet with a little room between each one.
- Bake for 25 to 30 minutes, until the stuffing balls are set and golden on the outside. Let them rest for 5 minutes before serving.